Data Sources
General
Datasource Type:
Default: configure datasource via UI.
Custom: only use the Custom Datasource Type when you want to customize the data retrieval and storage, and when the default configuration via the UI does not meet your needs.
Datasource Name: Name of the tasks to be shown in the planning view
Choose Color of Datasource: this is the color that will be used for the datasource in the planning board. This can be useful if you have multiple datasources (e.g. multiple teams) within the same datasource, and you need a visual indicator of which resource (e.g. person) belongs to which datasource (e.g. team).
Settings
Event Scheduling
Event Read Only: Default: Unchecked. When checked, users cannot edit event details.
Event Resizable: Default: Checked. When unchecked, users cannot resize events by dragging at the edges of the event.
Event Draggable: Default Checked. When unchecked, users cannot drag events.
Event Manually Scheduled: Default unchecked. When checked, 24Planning will NOT take into account dependencies to automatically reschedule events.
Enable Auto Rescheduling
In addition, there are some settings that govern the 24Planning behaviour in case multiple events are scheduled in parallel. In some use cases, parallel events are not desirable and you can specify that 24Planning should auto-reschedule those parallel events and reschedule future and/or previous events in the planning window to accommodate the new event:
(Beta) Auto Reschedule Parallel Tasks: Check the box in case you would like 24Planning to auto-reschedule parallel events.
(Beta) Auto Reschedule Mode:
Forward: Schedules the event to start immediately after the preceding task is completed, without modifying the dates of earlier tasks.
Backward: Schedules the event to finish just before the next task begins, without altering the dates of following tasks.
Forward-Backward: Combines both approaches by keeping the event in its current position while adjusting the schedule of other tasks, both before and after.
(Beta) Auto Resch Allow Push Out View: This setting allows the scheduling system to automatically adjust tasks outside the currently visible planning view. When enabled, tasks can be pushed beyond the visible timeline to accommodate changes. Note: Enabling this option does not account for events outside the visible view, which may result in overlaps with those unseen tasks. Use with caution if managing tasks beyond the current view is critical.
Event Batch Processing
You can use batch classes in conjunction with 24Planning to enhance the functionality of 24Planning with your own code plugins. There is an example batch class described further on in this manual. This section describes the batch class sections within the Datasource configuration. If you are not using batch classes, you can leave these settings unalterned.
Batch class name: name of the batch class.
Batch class: Dropdown with the list of batch classes that are available to link to this datasource.
Split batch events in groups: avoid hitting the Salesforce Governor limits by splitting in batches. Because Apex runs in a multitenant environment, the Apex runtime engine strictly enforces limits so that runaway Apex code or processes don’t monopolize shared resources. If some Apex code exceeds a limit, the associated governor issues a runtime exception that can’t be handled. Please review the Salesforce documentation to learn more about Governor limits.
Run batch Class on load: automatically run batch upon loading of the Planning Board. If not checked, then the batch will only be run when invoked manually (bottom left button in planning view).
Batch SOQL Safety Group size: set to max. 100 in order to comply with Salesforce Governor limits.
Event Object
Object: Select a standard or custom object that you want to display in the planning board.
Display Name Reference: reference to the field whose value will be shown as the name of the event.
A number of parameters on the event object are related to the way 24Planning works with non-working time. Visit the section ‘Defining non-working time’ for more background information on the concepts.
Scheduling Mode: Set to either Duration or Start Date. In case it is set to ‘Duration’, the start and total duration reference are used to display the event on the scheduler. In case it is set to ‘End Date’ mode the start and end reference are used to visualize the event.
Start Date Reference: reference to the field whose value will be used as start date of the event. The Start Date Reference should be of the type Date/Time or Date.
End Date Reference: reference to the field whose value will be used as end date of the event. The End Date Reference should be of the type Date/Time or Date.
Duration Field Reference: An integer field indicating the duration of an event in minutes. Its application varies by mode: in 'Duration' mode, this value is crucial for computing the event's end date; In 'End Date' mode, it's used for scheduling unplanned events that do not have a pre-defined start or end date.
Total Duration Field Reference: This integer field stores the total duration of the event, in minutes, as displayed in the Planning view. This includes both the event's duration and any non-working hours from the defined work schedule that fall within its timeframe.
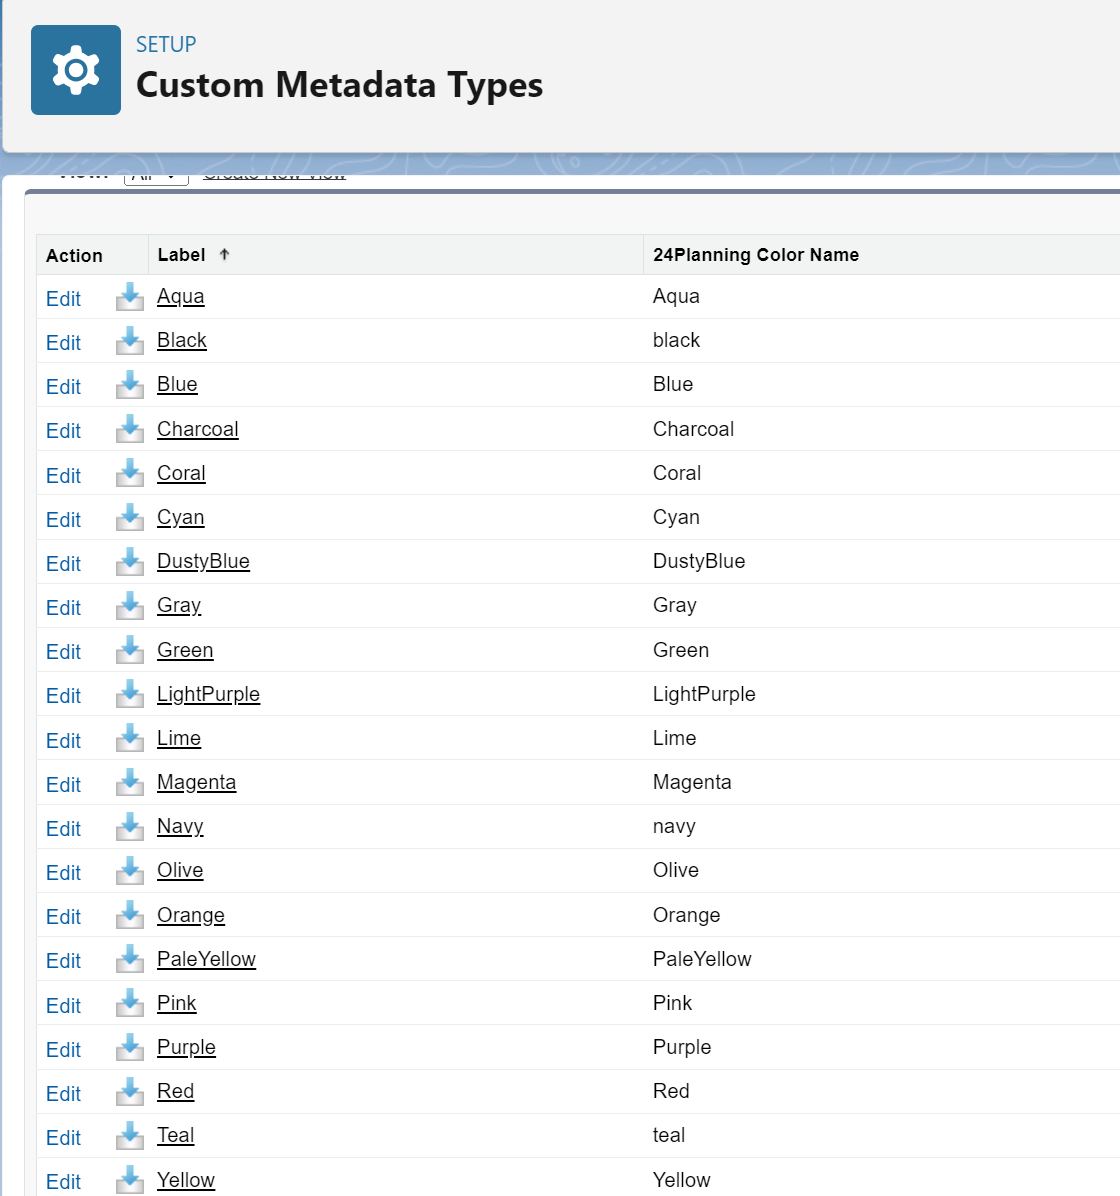
Background Color Field Reference: reference to the field whose value will be used to select the background color of the Event on the planning board. This should be a text or formula text field where a reference is made to a color defined in the custom metadata (see below).
Text Color Field Reference: reference to the field whose value will be used to select the text color of the event box on the planning board. This field is OBSOLETE as of 24Planning R3.3 where we switched to HSL color schemes in which the text color is determined automatically.
24Planning adopts a so-called HSL color scheme for events. HSL stands for hue, saturation, and lightness and is a cylindrical-coordinate representations of points in an RGB color model. The most common colors are defined as Custom MetaData Types > 24Planning Colors.
Predecessor Reference: lookup field to another record of the event object. The predecessor field allows you to show the relationship between events on the planning board.
Select Percentage Complete Field Reference: allows you define a % completion of an event in the Gantt chart which will be shown visually.
Select Sequence Field Reference: Reference to the field whose value will be used to display the sequence of the event in the Planning view. This should be a number field, representing the sequence of the event.
Select Event Read Only Field Reference: Reference to the field whose value will be used to determine if the event is read only in the Planning view. This should be a Boolean field, representing if the event is read only (applies both to resource planning and Gantt).
Select Event Resizable Field Reference: Reference to the field whose value will be used to determine if the event is resizable in the Planning view. This should be a Boolean field, representing if the event is resizable (applies both to resource planning and Gantt).
Select Event Draggable Field Reference: Reference to the field whose value will be used to determine if the event is draggable in the Planning view. This should be a Boolean field, representing if the event is draggable (applies both to resource planning and Gantt).
Select Event Manually Scheduled Field Reference: Reference to the field whose value will be used to determine if the event is manually scheduled in the Planning view. This should be a Boolean field, representing if the event is manually scheduled, meaning that no automation will apply (applies both to resource planning and Gantt).
Event Filter: The event filter allows you to define filters that hide certain events. Only the events that match the filter are shown on the planning board.
Resource
Resource Reference: list of related objects to the event object, select the appropriate one.
Resource Reference Display Name: defines which attribute of a resource record to show as a display name on the planning board.
Work Schedule Reference work schedule is an optional 24Planning custom object. The Work Schedule is used to define working hours and non-working hours to which the planning applies. Fill in the lookup field from the resource object to the work schedule object. More information on work schedules is available in ‘Step 5 - configure additional objects’.
Filter Resources: define one or more conditions that govern whether a particular resource is part of this datasource. As an example assume that have multiple teams and define a datasource for each team, then you can use the filter resources to only link certain employees to a particular datasource.
Datasource Rules (DEPRECATED as of v3.4)
Datasource Rules are replaced by the more generic concept of Flow Integrations as of 24Planning 3.4, please consult the section on Flow Integrations.
Datasource rules are used to execute particular validations on the events.
A concrete example could be that you do not want to plan events that have a start date in the past. Rules are implemented as Salesforce Flows and the above example is shipped together with the package, as an example rule, see Test Flow 24 Planning.
If you plan to add your own validated rules, we recommend you to copy this Flow and extend it with your own logic.
The Flow loops over the Events and potential rule violations are returned as a list of violatedEvents.
In case the list of violatedEvents is not empty, a popup will appear in the Planning view with an indication of what caused the error.
In case the “Is Explicit” flag has been set for the Datasource rule, the error cannot be overridden. When the “Is Explicit” flag is not checked, the error can be considered a warning that can be overridden. In this case, a Salesforce platform event will be raised whenever the warning has been overridden.
Resource Availability
As the name suggests, Resource Availability allows you to define the availability/non-availability of resources. The concept is closely related to work schedules. Please consult the section ‘Defining Non-Working Time’ for more background information on these topics.
Object Name: Object that contains the resource availability data.
Resource Reference: links the Resource Availability record with a Resource record.
Available Reference: Boolean indicating whether the record is defining an available or an unavailable time period.
Start Date Reference: Start date/time for the availability/non-availability.
End Date Reference: End date/time for the availability/non-availability.
Default Available: Does the undefined time count as working or non-working? Checked: Undefined time is considered working. Unchecked: Undefined time is considered non-working.
Resource Filter: Is the Resource Availability applicable to a subset of the resources.
Resource availability can be shown both in the Resource Planning view as well as in the Gantt Chart.
Unplanned Events
https://youtu.be/lAomPJLdrQA?si=dJBKfm-ywef5burR24Planning allows you to work with unplanned events that appear in a sidebar on the planning board. From the sidebar, they can be dragged and dropped onto the canvas. The fields shown in the unplanned events sidebar is configurable via Dynamic Fields.
You can set the following parameters for unplanned events:
Enable unplanned events: Enable/disable unplanned events for a particular datasource.
Type: The type determines the behaviour when dropping unplanned events on the canvas:
Resource: Assign a resource to an unplanned event. The dates of the event are known upfront. E.g. assign a meeting room for a meeting (=event) for which the time schedule is known. You are unable to drop this event on an alternative date. The event should have a valid start and end date.
Time: Assign a time slot for an unplanned event when the resource is already known. You will not be able to allocate the event to another resource. The event should have a valid resource.
Resource and Time: You can allocate both a timeslot and a resource to the unplanned event.
Limit records: limits the number of unplanned events for a datasource. When the number of unplanned events exceeds the limit, only the first set of events will be loaded and search is limited to those events that have been effectively loaded in the planning app.
Event filter: when a filter is applied, only events that match the filter will show up in the unplanned events sidebar.
Dynamic Fields
https://youtu.be/2vAKo6l4G80Dynamic fields are fields that will be shown in the event details (for planned events) or as columns in the sidebar (for unplanned events). Dynamic fields provide you with the flexibility to show additional info required for appropriate planning.
You can configure the following parameters:
Field Reference: API name of the field that should be added as a dynamic field.
Read Only: Specifies whether this field is editable in the planning board.
Type: select whether this dynamic field should be shown for planned events, unplanned events, resources (in the left pane for resource planning) or in the Gantt Chart left pane. Note that lookup dynamic fields are supported only for events (not for unplanned events, resources or Gantt Chart left pane).
Order: determines the order in which the dynamic fields are shown.
Sorting: determines the sorting order for unplanned events (right-hand-side pane) and resources (left-hand-side pane). When multiple sorting fields are active at the same time, the higher number will be the first sorting criterion. In the example below, the left-hand-side is first sorted according to the resource name and then according to the datasource, note the 1 and 2.

It is also possible to apply grouping at the left-hand-side. In the example below, we group based on the datasource:
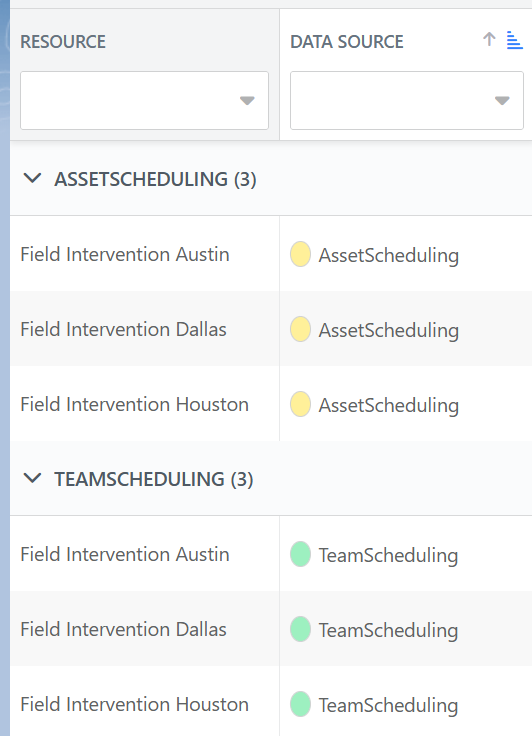
To configure grouping, you need to set the following fields within the Dynamic Fields defintion:
Group: Checkbox, when checked grouping will be applied on this Dynamic Field.
Grouping: Numeric value. Grouping can only be applied on one field, and the field with the highest numeric value will be the field chosen.
Group sort direction: Ascending or descending.
In some case you will want to work with multiple datasources in the same dataset. When you define dynamic fields for multiple of these datasource, 24Planning will ‘merge’ the fields from different datasources if these are the same field field of the same object. The behaviour of 24Planning is as follows:
Unplanned Events: the field with the highest order will be used. This means if the config of readonly, hidden, … is different between the two datasources the dynamic field config with the highest order will be used to display the column.
Event Filter: same applies as for unplanned Events.
Hiding default fields
When you doubleclick on an event in the planning board, it will show a number of default fields, as shown in screenshot below.
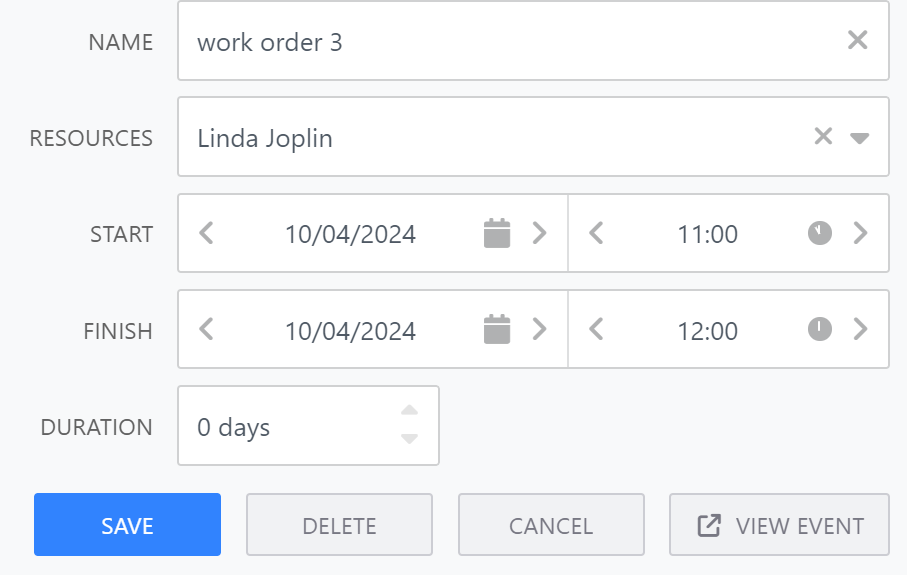
You can hide the default field by configuring a dynamic field on a datasource with the following names:
sfy24__name: the name field of the event, unplanned event or resourcesfy24__durationsfy24__dataSourcesfy24__resourceId: the resource field in the event or unplanned eventsfy24__startDatesfy24__endDate
When you check the hidden checkbox, the default field will not appear in the planning canvas and/or the unplanned events sidebar.
For example, in case you would like to hide the Datasource column (shown next to the resource column) and the following configuration for a dynamic field:
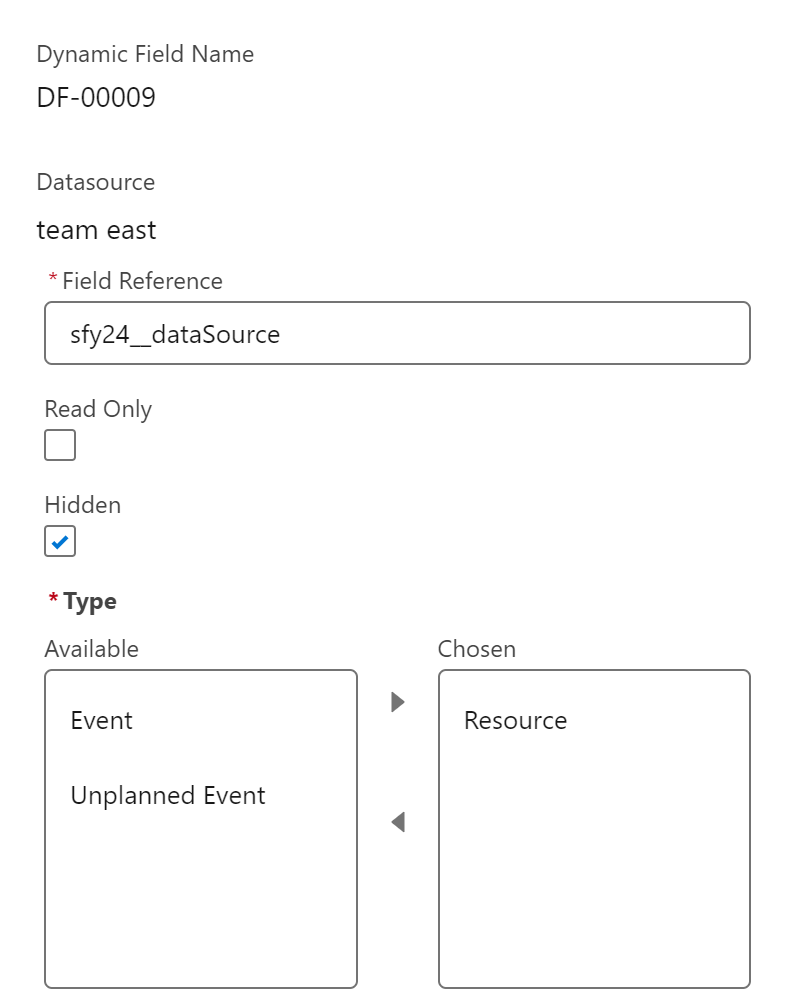
Hiding the datatasource column in the planning board.
Note: if you are upgrading from an older 24Planning release, you may need to first add the Hidden check to the Dynamic Fields page layout.
